Thursday, July 29, 2010

Urban Adventure - Toronto Islands Paddle

I had brought my Cedar Canvas canoe down to the city last month, but the two paddling events I wanted to attend (MEC Paddlefest & National Canoe Day) were affected by bad weather. I was getting bummed out that I couldn't get the canoe in the water, but fortunately was able to get some time to paddle around the Toronto Islands today. Here's a map image for those unfamiliar with this paddling hot spot in the city.


Toronto Islands & Cherry Beach Launch (Marked "A")

Parked at Cherry Beach and made the short paddle over to the Eastern Gap. The winds were gusty from the North today which made the island entrance with its concrete breakwater walls like a furious wind tunnel. Without the bow loaded with gear, I wasn't making much headway against the wind until I remembered a trick mentioned in this article (PDF format) about Omer Stringer paddling upwind solo. The trick being to get bow heavy by kneeling ahead of the centre thwart so the lighter end of the canoe points downwind. The fastest and most stable way for me to do this in the choppy conditions was to simply spin my body position around in the canoe 180 degree so that I faced the "stern" and was now kneeling ahead of the centre point of the canoe. Felt strange, but this tip works and I was able to paddle upwind solo with less effort fighting the wind. Once safely in the small archipelago, the wind was effectively blocked for some nice flatwater paddling and I was back to the usual paddling position.


One of the main canals

Came across a summer camp of kids that were goofing around on their camp canoes. Quite a fun sight to see while the kids chanted "Gunnel Bob! Gunnel Bob"

Lucky Kids Camp


Gunnel Bobbing competition

Also came across plenty of Fiberglass North Canoes meant for groups to tour the islands.


North Canoes moored on shore

The islands are a strange place to paddle...you fully realize that you're in an urban environment complete with airplanes landing at the airport, power boats zipping by, tour boats blasting music for day trippers, and the wailing ecstatic cries of children riding the Center Island Roller Coaster. But there are also very secluded areas only accessible by canoe or kayak that offer a nice relief and even some urbanized wildlife. Not included in these shots were sightings of a Great Blue Heron, numerous swallows, a pair of kingfishers, and even the elusive Black Crowned Night Heron.


Secluded naturalized canals


Mallard with chicks


Waterlillies everywhere


Painted Turtle on the log


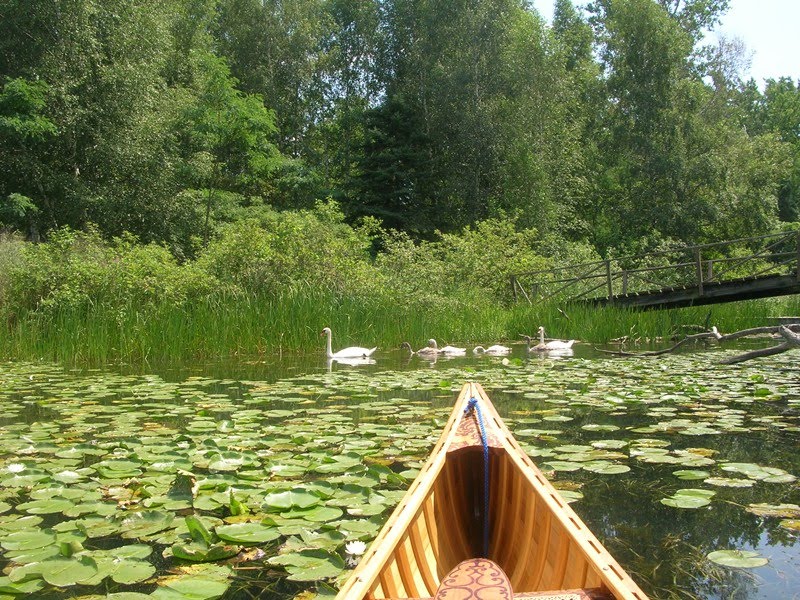
Family of Mute Swans

The city's landmark, the CN Tower was nearly always in view and provided a nice reference point to the easy navigating. Also came across another island landmark, the historic (and possibly haunted) Gibraltar Point Lighthouse.


CN Tower peeking through; Gibraltar Point Lighthouse

In my haste to get onto the water, I didn't pack a lunch. No problem though, I just paddled up the steps of the Carousel Cafe and ordered a juicy burger to go. Paddled to a shady spot under some willow trees for a canoe picnic! If any of my nutrition students are reading this and gasping...screw you...I'm on vacation!


Lunch Break

After more exploring, it was time to head back. Came across this location which seems to be used for a lot of the city's promotional photos. Certainly a nice spot for a city line view.


City Skyline

Back at Cherry beach, the protected shoreline was calm and virtually deserted. Great way to spend a summer day in the city.


Back at Cherry Beach


Monday, July 26, 2010

Canoe Pack Basket - Part 3

I've been checking out various pack basket harness designs on the net. Most involve cotton webbing, but I wanted to use leather and make it adjustable. With a great sale at my local leather supply shop (latigo straps & buckles at 50% off) I tried my hand at making an adjustable harness held together with copper rivets left over from the canvas pack project.

It involved making a short horizontal belt strap with buckle that encircles the basket right below the rim. Two more short belt-like pieces were loop riveted together and slipped on and the longer backpack strap pieces similarly measured and hung from the main horizontal belt...


Assembled Leather Harness

Here are some shots with the harness all rigged up...


Success! I've already used the basket to lug around awkward tools and junk back to the locker room. It'll have to wait until we're up north again to use in the canoe, but I can see a use for this for day trips; harvesting roots and bark in the bush, or even for winter snowshoeing.


Friday, July 23, 2010

Canoe Pack Basket - Part 2

Pack baskets typically have a handle at the back to take the strain off the straps when lifting. I've seen it made from leather, but the more aesthetic ones are made from bent wood. Wanting to use up some scraps, I thought I'd try to bend a handle out of walnut stock. 4 strips of differing thicknesses and lengths were soaked overnight and then added to pot of boiling water on the stove. Could've carved a form to bend around but got a little lazy, so once softened, I bent them by hand and eventually placed them in a trigger clamp to hold the shape. Only 1 piece cracked so I had three pieces to choose from.


Bent walnut stock in clamps

In the end, I opted for the piece on the right. It didn't bend symmetrically but had the best length and proportions. While it dried out, I begun to lash the rim with 1/8" leather lace in a double cross pattern. Some space was left in the back for the handle which was shaved down with a crooked knife and further shaped with notches where the inner flat rim would rest. The tips were cut down to a point to insert into the weave of the basket.


Bushel handle; Inserted into the rim

After the handle was securely in place, the remainder of the rim was lashed with lace to end up with the following...


All lashed up

The bottom of the basket still needed runners - pieces of wood that elevate the bottom weave from the ground while also securing the straps of the harness. An unused scrap walnut found in the storage room would do nicely. It had a distinct warp to it, but I figured it was still usable for this project since the bottom of the basket will naturally bulge and curve when loaded. At 1 - 1/8th", it was too thick so after marking out the pieces, I shaped them down with the spokeshave and rounded the edges. Slots where the harness straps would run through were chiseled out too.


Walnut stock; shaped with a spokeshave

The pieces would be secured to the basket with wood screws attached to inner runners made from another scrap piece of neatly planed basswood - figured the light creamy basswood would blend nicely with the unstained reed. I couldn't resist decorating this wood with pyrography since it burns so well, so one of the inner pieces has a paddle design quickly burned on it.


Runners complete; attached to the bottom


Paddle Decoration


View into the bottom

Unfortunately, trying to reach down into the basket and screw the runners properly proved to be a major difficulty as I had difficulty seeing and had to work by feel. In the end, they went on lopsided, but this is the bottom of the basket so I didn't care by this point.

Still to do...a custom pack harness saved for another post.

July 26 Update: Part 3 now posted


Wednesday, July 21, 2010

Canoe Pack Basket - Part 1

Last year I made the mistake of trying to attend another Canoe Museum workshop on making a woodland pack basket. I say it was a mistake because after paying for it online and reserving the spot months in advance, I realized it was on my wife's B-day. Well that didn't go over too well...a present for myself on HER birthday! Thankfully, the museum staff appreciated my bumble and gave me a refund. Still I've been drawn to these beautiful pieces of traditional gear to augment my refurbished canvas pack. These most authentic of these pack baskets are made with pounded black ash (or brown ash as known in Maine) which involves a ridiculous amount of labour but results in a very sturdy basket. Ash Baskets by Fran has a large canoe pack basket for a mere $1000!

The cheaper alternative, especially for light use is to use Rattan reed. An online tutorial by Kathy Couture made the steps seem simple enough and I was able to source out the materials from Bamboo Bazaar, a family run business in the same West Toronto location for the past 50 years. They were helpful with me as a newbie and the price for a coil of 3/4" flat reed & 3/8" flat reed worked out to be just over $20 bucks.

Once at home, I worked out the rough dimensions I wanted - a base of about 8 x 12 with a height of 20". The process started off as a bit of tangled mess, but eventually the weaving progressed nicely.


Base stakes & staves laid out

I wanted to end up with a basket that had the traditional flared belly design with a narrow narrow top and roughly shaped it into this with my hands by keeping the reed wet. Towards the middle of the basket, I realized I had made a series of weaving mistakes during a lapse of concentration, but kept going rather than undoing my work. In the end, the basket is functional but certainly has some novice errors. A few of the weavers were placed with the rough side out, resulting in a frayed appearance, but I can live with that as a first attempt.


Basket weaving stages


Basic basket complete

The rim of the basket was made by placing an inner ring of flat reed and an outer ring of oval along the lip so the basket weave was basically sandwiched between these layers. Rather than use metal fasterners, I was planning on tightly lashed the whole thing with 1/8" leather lace. When viewed from above, this system leaves a gap between the outer and inner rim structure that shows off the ugly clipped endings of the baskets weave. To cover this, the traditional method involves using some coiled seagrass, but I forgot to get some when the materials were originally purchased. Instead, I ended up using some jute twine from the dollar store and hand wound them into 2-ply cordage. This was laid down on top of the basket rim before lashing.


Hand wound 2-ply jute cordage; clamps on rim

So far it's progress nicely, but there are still lots of steps before it's complete, including:
• steam bending and carving a wooden handle
• making wooden "runners" that protect the bottom
• cutting and riveting a leather harness

July 23/10 Update: Part 2 has been posted


Monday, July 19, 2010

c.1839 Fur Trade Paddle

This post from Oct '09 highlighted an antique paddle in the collection of the Minnesota Historical Society. Here's the image and description below...

Wood paddle has a long slim tapering blade. The flat grip has a concave indention at its base and elaborate carving on its remainder. Carved design includes a curved cross, a shield with a diamond and scroll band, and diamond shapes filled with cross-hatching. There are also the carved initials "W. D.", which may not be original. Donor states that the paddle was found near Stillwater, Minn., following a battle between the Ojibwa and Dakota, ca. 1839. Paddle is purported to have belonged to a voyageur.

I was able to find another grainy shot of the same paddle and tried to improve the image as best I could. This one (with increased contrast) clearly shows the decorative etchings on the grip including the initials "W.D" squeezed into the middle section. Nice bit of decorative folk art and yet another design I'd like to replicate...

Paddle; Grip Closeup


Friday, July 16, 2010

Cottage Life Canoe Paddle

The headquarters of Cottage Life Magazine are located nearby my wife's workplace. Knowing as she does of my paddle hobby, she noticed a giant ottertail paddle on display of their main facade and thought it may be of interest. The weathered paddle has blended in with the reddish tone of the brick, but it's a nice decoration, nontheless. Here's a shot...


Cottage Life Building Paddle


Closeup

Using some measurement tools in photoshop and extrapolating from the dimensions of the doorway height, I estimated the paddle to be around 115" (just over 9.5 feet) long with a 52" long x 12" wide blade. Huge!


Tuesday, July 13, 2010

Historic Paddle Photo - Maliseets at Kingsclear FN

Found a historic photo of some Maliseet paddlers from Kingsclear First Nation. Apparently this photo was taking in 1887 in celebration of Corpus Christi Day. Beautiful bark canoes, traditional dress and even a priest are in view.


Original Photo

Some enlarged shots of the standing paddlers in regalia show some beautiful, long paddles with a traditional Maliseet grip style.


Paddle Closeup


Saturday, July 10, 2010

Historic Paddle Illustration - Minnehaha Feeding Birds

The artwork of Frances Anne Hopkins mostly features scenes with Voyageurs that serve as a wonderful ethnographic record of this era. Another painting of hers reflecting a more fictitious scene is "Minnehaha Feeding Birds". It features an Indian Maiden with an extended hand trying to entice the birds that have serenely perched on the gunwales of her birchbark canoe.


Minnehaha Feeding Birds
Frances Anne Hopkins
ca. 1880

A red bladed paddle is resting across the top of the canoe and seems very similar to the brightly colored paddles of the Voyageurs to which she was much more acquainted. The scale and dimensions of the paddle also seem quite narrow. I wonder if she simply used her knowledge of actual paddles around her in this conjured scene or if she truly came across natives using painted paddles in her journeys.


Paddle Closeup

For a similar theme, check out David Wright's painting "Quiet Reflections" featured a while back which also shows a red bladed paddle being used by an Indian in a bark canoe.


Newer Posts Older Posts Home Page