Sunday, November 29, 2009

Leather Paddle Whipping

Last year I ended up using some scrap leather to make a removable paddle sleeve to protect the shaft of the paddle from scraping against the harsh aluminum gunwales of my fiberglass canoe. This design has served its temporary purpose well and has been used on-and-off with many of the paddles in the growing collection. However, with the Attikamekw design being on of my preferred blades lately, I decided that a more permanent leather wrapping was in order.


The temporary paddle sleeve

One option was to use a single piece as before and tightly stitch it similar to oar leathers documented by David Churbuck's well-illustrated blog post using a Shaw & Tenny leather kit. However, with canoe paddles, it seems that whipping the paddle with some sort of cordage is the more common route. There's a brief article in CanoeRoots Magazine(Summer 2008) on page 13 that describes whipping the paddle, though the online pics are small. Charles Burchill's page has some pics of the final result although both sources seem to favour usings modern cordage that I find clashes with the feel and texture of a traditional one-piece paddle. By the way, doing an internet image search for "paddle whipping" leads you to all sorts of nasty pics of people with bruised buttocks...should've known that before blindly typing in keywords!

Back on topic. Instead of using whipping twine, some 1/2" wide saddle string was obtained from my neighbourhood leather supply shop. Along with tiny brass tacks, my goal is to make a permanently fastened leather wrap similar to some of the Turtle Paddle brand paddles I've seen. To ensure the bottom of the leather wrap was even with the shaft, a 4 inch length was snipped from the tip to the edge. Once soaked in water to thoroughly wet the leather, the thinned end was tacked onto the shaft just above the throat.


Trimmed end; Tacked into place

Then the soaked leather was very carefully wrapped by stretching with all my strength and carefully positioning it on the shaft. Believe it or not, it was really tiring work on the muscles. The stretching is necessary so the leather shrinks when it dries and forms a much tighter grip on the wood, otherwise it would likely loosen and unravel.


Stretch and wrap slowly


Nearing the end

Couldn't take pictures of the final tacking as I had to work fast and it was a bit tricky. Essentially, I stretched the end as much as it would go and gently pressed in the tack in my thumb to mark the spot. A clamp was put on the working end of the wrap to prevent it from unravelling and with the hands free, I pulled the end back to the marked spot and hammered in the tack. The wrap was left to dry in the sun for a while and then the it was treated with SnoSeal, a Beeswax based waterproofing agent, which not only works well but smells like the tastiest thing ever. I used it with leather hiking boots and snowshoe bindings with great results

The technique involves heating up the leather with a hair dryer and then applying liberal amounts of product with a brush. The pores of the leather open with heat and absorb much of the melted wax until a saturation point. At that stage, the excess is removed with rag and the leather buffed.


Heating up the leather


Applying the waterproofing beeswax formula


Despite chilly autumn temperatures, I was able to test out the wrap during a short jaunt on the lake. You can see the water beading off the leather and after a while of exaggerated prying off the gunwales, the leather is secure and hasn't shifted. Some experts might question the use of this paddle accessory, but it doesn't add much weight, protects the paddle sufficiently, and dampens the sound of paddling with strokes like the Canadian / Northwoods which requires the use of the gunwale as a leverage point.


Waterproofed leather holding up; View off the bow


Thursday, November 26, 2009

ROM Bark Canoes

After my excitement of "discovering" a bark canoe on display at Blackcreek Pioneer Village in Northwest Toronto, I was delighted in hearing that a First Nations exhibit of the Royal Ontario Museum (ROM) also had some bark canoes on display. I was shocked to learn of the newly inflated admission prices at the ROM, probably to pay for the hideous new "Crystal" addition to the historic old building. Turns out that it recently made the list of the top 10 ugliest buildings in the world!

In any event, the museum is FREE on Wednesday afternoons from 4:30 to the 5:30 closing - a perfect amount of time to peruse this small gallery on the museum's main floor. So I went down to specifically examine their small collection of canoes and other artifacts.


General view of canoe exhibit

The first canoe on the wall had some very interesting features that I had never seen before. One of the first things I noticed was a partial length, thin second outwale nailed to the original root lashed outwales. Information on whether this was a repair to a cracked outwale or part of the original design wasn't provided. You can just make it in the enlarged version of the photo below.


Algonkin Canoe
Late 19th century
Area of Origin: Northeast Ontario; White Bear Lake
NS23087

Also interesting was that the stem area wasn't lashed, but rather the bark nailed flush into the stempiece and them sealed with gum. This seems like a more simple and watertight solution to lashing, especially since it is the stem area of my canoe where the water perpetually leaks from. If I ever get around to building a 2nd canoe, I think this'll be the route I take. Didn't notice it right away, but underneath the hull was what looked like a short wooden keel nailed to the bottom of the boat. Not sure if it was there to stiffen the hull as a repair job or made to improve the tracking of the boat on open water. Either way, this is the first time I've ever seen one on a birchbark canoe.


Nailed bark to stem; Keel nailed to underneath of hull

Of course, the real eye-catcher of the display is the huge 36ft Montreal Freight canoe built by César Newashish (of the famed NFB film, Cesar's Bark Canoe). I've seen a 24 ft North Canoe built by him at the Canadian Canoe Museum, but this one was a monster in comparison - so huge, I couldn't get a proper lateral shot. It is being supported with straps and foam strips across the gunwales. This canoe is on the ROM's Audio Tour which provides some extra (albeit hokey) information about the boat.


Newashish Freight Canoe

A closer look on the gunwhale cap shows a repair where a piece had cracked - basically a scarf joint that is pegged into position. Useful to know if the caps ever break.


Repair to gunwale cap

Another thing I noticed about this canoe was the complete absence of any gum on the seams. It would seem that that this canoe was probably never built to be used but rather displayed as a museum piece. Either way, the sheer scale and time invested in making one of these crafts is a testament to the skills and patience of the builder.


View from the other end - no gum anywhere


Tuesday, November 24, 2009

Canoe Paddle Puzzle Art

Oldpuzzles.com has a massive collection of (go figure) old puzzle toys with interesting decorative artwork. Managed to find two puzzles with some paddle illustrations.

The first is a highly romanticised version of two scantily-clad Indian maidens entitled The Canoe Girls with one of them holding a decorated spear-like paddle, very much like the early Mi'kmaq design documented by Adney.


Date: 1930s
Pieces: 300
Maker: Beraton, S.W.
Artist: Relyea, Charles


Another puzzle shows a woman in fancy dress paddling a sharp stemmed bark canoe with a rather long beavertail paddle. It's entitled A Rose Among Lilies and comes with a pretty risqué subheader - "Wouldn’t You Rather Paddle Her Canoe than Your Own?"


ca. 1933
260 pieces
11”H x 18”W
artist: W. Granville Smith
Cut 1930s by unknown maker, plywood, interlocking, irregular edges, upper and lower halves double cut together to make interchangeable pieces. This picture, also by W. Granville Smith, appeared as the centerfold in an 1896 issue of Truth magazine with the catchy double entendre sub-title above and a very attractive female engaged in an unusual athletic activity (for women)


Perhaps the inspiration for the puzzle was this actual picture of Mabel Frances Whittemore, wife of Reginald Whittemore who founded the Nature Canada charity in 1939 in honour of his late wife. Can't imagine having to kneel in a canoe with a corset and dress, but they sure look stylish!


Mabel Frances Whittemore paddling her canoe


Saturday, November 21, 2009

Another Canoe with Runny Pitch

During a heat wave back in August, the gum on my bark canoe softened so much that it began to run down the sides of the store boat (see pics of the meltdown here). Came across another bark canoe with a similar problem. Looks like it was the 26foot North Canoe used for the French Reality show Destination Nor'Ouest, built by John Lindman (posted about it here). Unfortunately, I don't get the TV channel where it aired, but discovered a facebook page with pics.


Before...


...During use...


...and After!

The slightly heated garage where my canoe is stored gets down to about 8 degrees celsius in the winter. I'm hoping that'll be cold enough to harden the pitch and allow me to to delicately chip it off without damaging the bark. I'll then try to properly repitch later in the early summer.


Wednesday, November 18, 2009

Canoe Tump Project - Part 3: Using the Rig

The leather canoe tumpline has been constructed, but before I could give it a test run, I wanted to learn more about its correct method of use. Given that this piece of equipment is seen as "outdated technology", most sources that discuss its use are old archived texts. This online article in Popular Mechanics (June 1952) outlines the technique for lashing the tump to the center yoke and securing paddle blades as a shoulder rest. Although, their method calls for drilling holes into the thwart and using copper line to keep paddles in place.

This article by a canoe tump enthusiast suggests a contoured centre yoke is a horrible innovation. His method requires the replacement of the "stinky" centre yoke with 2" diameter round aluminum tubing. Might work for him but not going to happen with my boat.


Contoured Yoke Protest

I also came across a recent article Portaging a heavy canoe with a Tump Line (PDF Format) from a staff member of Camp Nominingue in Quebec. This full colour, clearly written article outlines all the technical aspects although they tend to use canvas & cord based tumps. Interesting that their lashing method involves securing the tump cord 1.5 inches ahead of the actual centre thwart.


Camp Nominigue Setup

Since my leather tump is akin to the Northwest Woodsman's site, I've used his photos and accompanying YouTube video to learn the correct method of lashing it in. The video shows the method for a wanigan first and then for a canoe around the 3:50 mark. His canoe also has a contoured portage yoke just like mine.


NW Woodsman Tump Pics

However, one thing I never quite liked about the paddles being lashed in the claustrophobic space created by sandwiching your head between the blades. While re-reading the classic birchbark canoe text, The Building of a Chippewa Indian Birch-Bark Canoe by Robert E. Ritzenthaler I came across a paragraph (p. 96) describing one native way of using the tumpline.

It involved lashing the grip end of the paddles to the centre thwart with the blades pointed towards the bow. The position is such that the the shafts of the paddles are flared away at the yoke resulting in a much more open triangular space. The arms are wrapped around the shafts with the hands loosely griping the sides of the tumpline on the forehead. Here's the accompanying photo on pg. 95


One Native Tump Method

This last method appealed to me the most. With all tumplines however, trial and error to get it adjusted just right to work properly. While up north for a brief fall getaway, I got a chance to test out the setup. The tump was secured to the yoke with simple hitches but it took me about about 45 minutes of fiddling to finally find the right length. In the end, I figured out that for my boat and yoke, the best measure was when the centre of the tump's headpiece just touched the bottom of the hull when pressed down with my finger. This will make it much easier to attach/adjust in the future so as not to waste much time.


Laying out; Clove Hitch to Yoke; Re-adjusted length

The slack was used to tie in the grips of two paddles and a piece of 1/2" wide leather strip was used to secure the blades to the seat. In the end the setup was quite secure.


Grips lashed in; Blades secure; the final setup


Canoe tump portage

The results: I'm totally impressed with the use of tumpline. While my boat isn't a heavy beast to begin with, the tump and paddle setup really make for an seemingly lighter carry. I walked around the property with the canoe (including uphill) to a parking lot area drawing some funny looks from neighbours and while it wasn't an authentic bush portage, the tump carry did make a difference on the shoulders. From a safety standpoint, if I slightly shrugged my shoulders up and tilted my head back, the tump would slip off and roll backwards because of the way it was lashed in. A simple hand motion would swing the tump back into place onto the top of the head so it is relatively easy to get in and out if needed.

Especially significant was the ability to let go of the paddles and rest the arms while the tump & shoulders balanced the boat. Also, with the bulk of the weight borne by the tumpline, you only really need one hand to secure the boat while moving. To take the picture above, I set up a sawhorse in the driveway, placed the camera on it, set it on a 10 second delay and walked into position, all the while efforlessly balancing the canoe with the tumpline. It may have its critics, but for me, I can see the potential in this piece of gear.


Tuesday, November 17, 2009

Chip Carved Malecite Paddles by Francois Rothan

Francois Rothan recently sent me some pics of two Malecite style paddles made for a client decorated with custom chip-carving. One is made from cedar and the other from maple. More of Francois' beautiful paddles and bark canoes can be found on his site, birchbarkcanoes.blogspot.com


Chip carved decoration on the blades


Delicate carving on grips


Maple Grip Closeup


Friday, November 13, 2009

Refurbished Woods No.200 Canvas Pack: Part 1

For decades, the canvas canoe pack was the basic piece of storage gear for a canoe trip. People today either continue to expound on their virtues or curse them in favour of modern, high tech alternatives. In the U.S., they are marketed as Duluth Packs and the company (started by French Canadian Camille Poirer in 1882) still churns out beautiful (and expensive!) packs today. One such pack was recently listed on Ebay for $100,000 US!

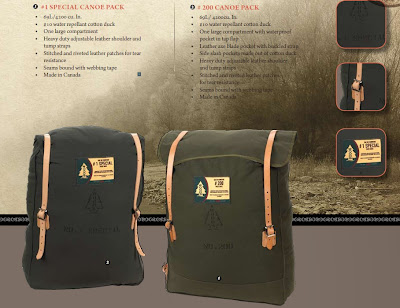
In this country, Woods Canada made their own versions beginning in 1909. These packs simply referred to as "Woods Packs" feature prominantly in the paddling films of Bill Mason but had a much more common utilitarian role of hauling forest fire hoses and axes in the bush. Below are the two models, the No.1 Standard and No. 200. These designs were later adapted by Duluth Pack to make their famous Northwoods Pack.


No.1 Standard and No. 200 Woods Packs

The company closed up shop a few years ago, but their their trademark and product line have been acquired by another company and many of these items are being produced again. Here's a pic from their 2009 Catalog.


From the Woods '09 Catalogue

In keeping with the direction of making my own gear, I decided to try and attempt a basic canvas pack for the planned canoe trip next summer. This fastastic Tutorial on making a Canvas Pack was detailed enough, but not having access to an industrial sewing machine limited my options. I also had a hard time sourcing out heavy duty 15oz mildew treated canvas from a local source and wasn't about to pay the expensive shipping and import duties if I ordered from abroad.

Instead, I stumbled on the page of Backcountry Gear Exchange, a small outfitting company based in Kearney (just outside the western access points to Algonquin Park) that was setup to recycle and reuse old gear. I picked up a battered old Woods #200 pack for $25 CND (brand new retail for $115 + tax). It needed repair to the leather components and was missing the tumpline strap, but overall the heavy duty canvas on the faded pack was sound. Here are some pics with it partially filled with a bag of wood shavings.


Views of the pack - front, side, back

The leather straps on the pack needed replacement. Removing the simple splash rivets was simple enough with a pair of pliers, but a former repair job on one buckle area used Slotted and Robertson screws that were preened over square bolts as a makeshift rivets.


Torn tumpline buckle strap; Makeshift rivets

Removing them required sawing the face of the bolt into quarters with a small hacksaw and then chipping away at the metallic fragments. Once loosened, the screws came off easily enough.


Sawing the bolt face; one screw rivet removed

With the other leather pieces removed, the canvas pack will get a thorough washing to get rid of the grimy stains on the exterior. Then the bulk of the leather components will be replaced. More of the next stage posted here.


Tuesday, November 10, 2009

Cree Carved Paddles

Found some photos of Cree elders carving canoe paddles (looks like from knotted spruce). Via the International Boreal Conservation Campaign website with photos credited to Natasha Moine.


Instruction from an Elder


More carving


Hanging paddles to limit warpage


Newer Posts Older Posts Home Page