Wednesday, January 28, 2015

DIY Bucksaw Camping Chair

One of the winter projects I've been working on is a collapsible camp chair for canoe tripping. I used my homemade stool / convertible camera tripod last season, but it would be nice to have something with a backrest. A lot of folks in the paddling community have been raving about the Helinox Chair One, but spending over $100 for camp chair felt excessive given our current needs for a seemingly endless diaper supply.

After stumbling on Tony Miller's Pinterest page "Canoe Projects", I came across the source of inspiration...the Knudsen Bucksaw Chair!


Designed by Danish engineer Ole Gierløv Knudsen in 1962, it and an accompanying cot were created for a camping trip with his son. The original chairs from the 60s are apparently expensive collector's items today and are being re-made for the modern market, though mostly as indoor furniture for the urban chic crowd.

The chair is held together by the tension of the windlass cord and fabric. The wood components are custom carved and the whole thing collapses into a stuff sac.


For a while I toyed with the idea of recreating the exact chair, using scrap canvas to sew the fabric and some Sassafras for the wood components. But with less free time available lately, I simplified the idea with prefabricated scraps at home. All of the wood components were leftovers originally purchased at Home Depot, so they are pretty accessible. Here is what I came up with. Unofficially, it's called the Basmati Rice Burlap Bucksaw Chair.


Little different that the original inspiration in that there are two windlass cords for the front and rear legs with a fabric back and wooden slats for a seat. But the concept of using tension similar to a bucksaw is the same.

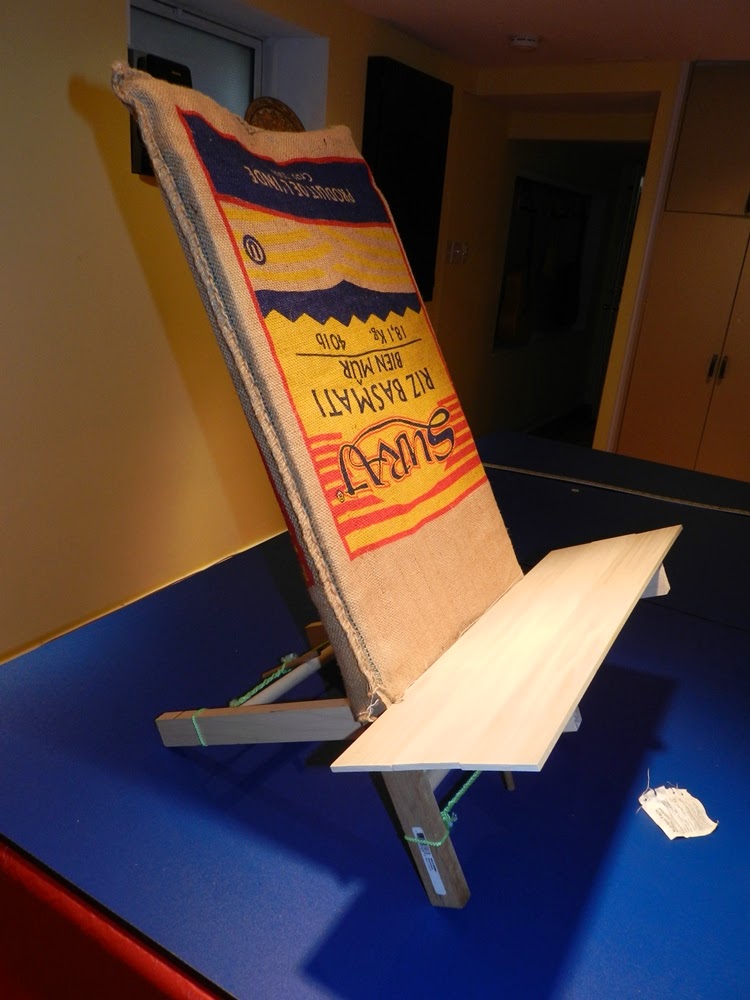
Here are the components laid out from top to bottom:

  • Backrest fabric is a 17" w x 26" l burlap bag of rice - an old pillow case could work too.
  • seat slats are 3 loose pieces of 1/4" x 2.5" w x 24" l poplar panels
  • 2 seat legs made from a remnant of 1x2x8 of maple (actual dimensions are 3/4" x 1.5"w x 22" l)
  • 2 backrest legs made from the same maple stock ( 3/4" x 1.5"w x 30" l)
  • 2,  3/4" poplar dowels for the cross braces (long one = 13.5"; short one is 11-7/8ths")
  • some cordage and 1/4 dowel sticks
I also used a little wood glue and 6 screws for the braces on the backrest legs, as well as a 3/4" spade bit to drill out round notches for the dowel cross braces to fit in.

Unlike the original Knudsen Bucksaw chair which has the seat legs nestled into a carved space on the exterior of the backrest frame, I ended simply attaching 2 cut block of maple onto each long using some glue and screws. Took some trial and error, but eventually settled on on placing these blocks so that the space created between would be 7" from the leg bottom.

Also, I ended deviating from the Knudsen design by purposely flipping the legs so that these notches facing inward rather than outward. The following sequence of pics might explain this better.

Here is the 1st step. Stick the long legs into the burlap sack with the "blocks" facing inward and tension with the cross piece and cord.


Then I place the other short legs into the support blocks and tension with the second dowel and cord. The tension created by the inner structure has a sort of friction lock at this stage. This is the view of the back of the chair...


Flip up and adjust how far back you want the chair to lean. This is accomplished by slightly squeezing the shorter seat legs towards each other near the block supports. The legs can then slide through the blocks and when you let go, they snap outwards again for an instant friction lock.


I had originally thought of using fabric for the seat again, but found that because of the width of the burlap back rest, something would need to be customized. I later got the inspiration from my 6 year old son who was playing with the 1/4" poplar boards building a sort of racetrack. I snagged 3 of his boards and found that they could easily rest, edge on edge on the projecting maple seat legs and sure enough work as a comfortable enough seat.


The take down process is quite fast and with the components stacked neatly and secured with the cordage it forms a nice bundle.


Here it is wrapped in the burlap sack. At 32" long, it just makes the cut for fitting in my Woods canvas pack. I also have an unused, narrow tent stuff sack that would be big enough to carry the whole thing and protect it from the elements if it needed to be lashed to the exterior. Or it could be lashed under the tumpline on the wanigan. Final weight is 4.8lbs. Like I mentioned before, it'll never be as compact and lightweight as the 2 lb Helinox chair, but I can live with weight difference.


Of course this is still in the raw stage. The wood hasn't been treated and I could tweak it a bit more but for now it is a functional chair. During one of our more balmy (-1C), depressingly snowless January days here in Toronto, I took it out to the backyard for a little test. Here is the backyard campsite complete with firebowl, kerosene lamp and a still uncompleted paddle thrown in for good measure.


Since I also tend to carry my Stewart River waxed canvas kneeling pads while paddling, I could theoretically use on of them as extra padding for ultimate camp cushioning.


Sunday, January 25, 2015

Ray Mears Bushcraft Paddle Video

Ontario Tourism is running a contest this summer involving a canoe package worth $10 000. The winner will get an all-expenses paid trip to Wabakimi Provinicial Park and paddle with some outdoor legends. The host guides are Ray Mears and Becky Mason. Here are some of the details from the official contest page

  • Round-trip airfare from anywhere in Canada or continental United States to Thunder Bay, Ontario where the adventure begins and ends
  • An 8-day fully outfitted trip including:
  • Floatplane into Wabakimi Provincial Park for 5 days of guided wilderness camping, paddling, bushcraft and wildlife observation with Ray Mears and his team
  • One night at Wabakimi Wilderness Eco-Lodge
  • Tour of Fort William Historical Park
  • All meals
  • Plus $2,000 in outdoor gear from SAIL


There is a promotional video making the rounds that shows brief footage of Mears making a bush paddle with an axe and crooked knife. Here is the screenshot at the 1:36 mark. Beauty!


In the summer of 2014, Ray visited Wabakimi for his own excursion. His blog post about the journey is filled with lovely text and photos. Here's one of Ray making a paddle on that trip:


Photo Courtesy: The Ray Mears & Woodlore Blog
Original Link


Over on the CanoeTripping.net forums, a member began a thread about the minimal tools required to make an emergency paddle in the wilderness. Most respondents (myself included) mentioned the use of an a saw, axe and crooked knife as ideal, but the original poster correctly points out that few folks trip with an axe anymore and the crooked knife is even more rare. A few folks have come up with ideas for an emergency paddle including using duct tape and barrel lid. Creative!


Friday, January 23, 2015

Historic Paddle Photo: Maliseet Guide with Paddles

Another paddle photo find in the December 1910 issue of  Rod and Gun in Canada ( Vol. 12, No. 7 ). The article entitled, "A New Brunswick Canoe Trip on the Fascinating Tobique" by Stephen B. Bustin features an image of the Maliseet guide posing with a slim guide paddle with tapering grip.


Paddle Closeup


Monday, January 19, 2015

St. Mary's Maliseet Grandmother Canoe Paddling

Found a Youtube video of the the replica "Grandmother Canoe" being paddled at St. Mary's Maliseet First Nation. After a brief, informal interview with G. Wayne Brooks, the video shows some folks bringing in the beautiful canoe to shore. Lovely paddles are being used to power this special craft. Here are some screen shots and the full video below...


Wednesday, January 14, 2015

Luke M's Ash Paddles

Blog reader Luke M from Wales has recently gotten into the paddle making hobby and has sent in some of his wonderful creations. Each paddle has been carved from locally grown ash with an axe and crooked knife. Most impressive! Here is a group shot of 4 paddles along with descriptions he provided.  These paddles are based on (left to right):
• The 1878 Malecite paddle at the Fredericton Region Museum (post here).
• Various historical fur trade paddles seen on this site and elsewhere.
• The Malecite paddle in the British Museum featured on your site (post here)
• The 1889 Passamaquoddy ocean canoe paddle in The Bark Canoes and Skin Boats of North America. It’s 75” long and is mainly used standing 


Here is a Cree style paddle with a modified grip carved with a beautiful grain pattern... 


Here is Luke's first attempt at making a paddle from a log completely by eye without any templates or guidelines. It was also carved smooth enough to not require sanding.


This last paddle was carved recently from another quarter of the same log...just lovely!


Luke also sent in a photo of his tool set. The crooked knife blades were made by hand out of old files annealed in his woodstove. The axe is an old Kent pattern head which was restored and fitted with a homemade handle too.


Very much looking forward to seeing more creations from Luke in the future!


Saturday, January 10, 2015

Peterborough Area Antique Tiger Maple Paddle

From the January 2015 Current Selections page of CherryGallery.com...


Tiger Maple Canoe Paddle
This hand-made maple paddle has a graceful handle shape and long blade with prominent tiger graining. It was most likely made in the Peterborough lakes region of southern O
ntario.
Circa 1910
5" w, 60" h
 $875


The blade shape and grip design seems to be consistent with the early Peterborough / Lakefield canoe building area. This post from 2011 discussed a paddle made by John Summers (former GM at the Canadian Canoe Museum) which was based on a late 19th century template design from Lakefield Canoe Company. 


19th Century Lakefield Canoe Co. pattern


Newer Posts Older Posts Home Page