Showing posts with label gear. Show all posts

Sunday, December 30, 2018

Gear Project: Woodstove camp case

Here are some old pics of a quick project update. A while back I picked up a Kni-co Trekker stove that was used once by the original owner after realizing winter camping wasn't for him and his girlfriend. The stove was in great condition, even though I could tell he lit the stove without using a false bottom or sand as recommended by the manufacturer. He lowered the price even further when I mentioned this so got it for around 1/2 price off retail.


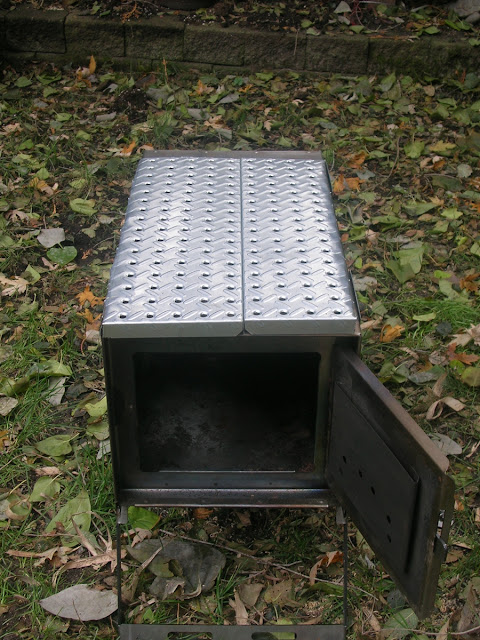
Canadian Outdoor Equipment sells a false bottom for the stove but it is quite pricey and heavy. Came up with my own solution using a metal pegboard from Home Depot. The length was a perfect fit and the sides were already pre-bent. Measurements showed that a single piece would be too large to try and fit through the door. So I cut a chunk out of the middle of the pegboard and fold down a single side on each piece. The two pieces cover the bottom of the stove and fit tightly with a friction fit, but can also be easily removed if needed. One piece is more narrow than the other so it can fit nested into the other when inverted. Here they are on top of the stove and then placed in the burned chamber...

Galvanized pegboard made into a false bottom.


In burn chamber

The new false bottom doesn't interfere with the storage of the collapsible stove pipe...


Of course galvanized metal can give off nasty fumes when initially exposed to fire. The stove has since been used and the toxic coating safely burned off. 

Also ended up making a carrying case of sorts for transportation and minimize any soot transfer. I used scraps of fire-retardant canvas to make a case that snaps open and closed. With some grommets and cordage, two carry handles exit from the sides to make lifting easier.
Scrap canvas pieces made opened up

The design allows for just one side of the carry case to open so that access to the stove interior is quick and easy.

opened flap to access stove door

Once everything is snapped up, the case does its job to cover the stove. In camp, I've used the empty case (still snapped into shape) as a way of collecting tinder and small branches.

Finished carry case

It was used well on my late fall trip back in October and fits perfectly on top of the wanigan for transport across portages. 


Tuesday, June 27, 2017

Removable Plank Seat Experiment

Back in 2012, I made a leather sling style seat for the 15' cedar canvas canoe. This was because I felt the trim was way off when the symmetrical Langford Tripper was paddled solo in the usual manner (by turning around and using the bow seat).


Leather Sling Seat

It worked  perfectly fine as a kneeling seat but turned out to be quite cumbersome when attempting to pole. Basically the presence of the sling required extra delicate foot work to avoid tripping when getting into a traditional poling position. Unbuckling the leather straps to remove the seat and then trying to re-attach them while in the boat proved too challenging. So another solution was in order.

The inspiration for the solution came from a Finnish design company that makes wooden children's tree swings. A carved seat with strategically placed slots for the rope to weave through


Plank seats are nothing new in canoeing history  - they were often used on large trade canoes when the crew wasn't sitting on the cargo directly. Anyway, before attempting to make anything too labour intensive, I set out to make a basic plank seat with some scraps. In this case, discarded twin bed slats left behind by a neighbour on garbage day. These 1x4 pine slats were in great condition and I've since used them in plenty of non-canoe related projects around the house.

Discarded IKEA bed slats

Anyway, some holes were drilled and notches easily cut out in the plank. Then some remnant paracord was tied together in a double fisherman's knot and looped through the inwales. There's enough slack in the cordage to wrap around a third time in order to elevate the overall height, but this is how the plank seat is setup for now.


The seat does wiggle a bit from side to side and front to back because it wasn't perfectly shaped to fit the contours of the hull at this point in the experiment. It might get shaped better at a later date. What does work nicely  though is that it can be unhooked easily on one side and then positioned on the centre thwart out of the way for clearing some leg room.


Hoping to take the canoe out poling later in the season to see if the idea works. Right now, most of Southern Ontario is experiencing record high water levels due to heavy rainfall.


Monday, February 13, 2017

Next Major Canoe Gear Project: Convertible Wall / Baker Tent - Part 2

The Wall tent project has come along nicely (see part 1).  After attaching the poly tarp panels to the canvas roof some time was spent developing the internal frame.

The key to any wall tent frame are the steel angle joints that help support the poles at the right angles for the canvas structure to be relatively tight and taut. After contacting some different wall tent companies, I was told that because of the unique dimensions of of my tent, the standard joints for most wall tents would not work. Most are based on a 120 degree at the peak and my tent would need a different angle. The cost of customized production and shipping were just going to be too high.

A much cheaper (but lower quality) option was found on Amazon.ca - a 3 way pipe fitting which I figured could be rigged for this project. It had the extra bonus of being adjustable in case my angle calculations were wrong.

32mm (1 1/4")  ID Adjustable Angle 3 Way Pipe Clamp Fitting

The fitting adjusts with a 6mm Hex key wrench and clamps down on a 1-1/4" diameter pipe. Turns out that most closet poles are roughly this diameter so it would work. Robin L used a pine closet poles of various lengths for his internal frame the longest of which is 6 feet. These can fit  neatly into the bottom of a canoe, but I wanted to make my version more compact so settled on using maximum 3 foot long pieces that could be easily stored and handled on a portage.

After some experimentation with scrap materials at home, I ended up using a combination of metal closet rods and  wooden dowels to make the free standing frame. They would be cut into a variety of lengths (between 1 to 3ft) to fit the requirements, but I liked the system because the solid dowels can nest into the hollow metal poles for easier storage.

When laid out on the work table, it looks like a disasterous overload of poles...


But after nesting, the poles are much more contained and manageable.

Poles nested and collected for storage


To pack them for a relatively easy carry, I ended up using another piece of heavy duty fire and water resistant treated tarp. The original, dark brown 6x8  tarp was on a super cheap closeout sale (cheaper than ordering fabric) and it was cut up to make a pack (another background project). I used the remnant piece (42" x 66" ) by laying the poles in the centre, folding in the sides and rolling to form a simple bundle.


For now it is secured with paracord but I might get fancy and make a leather roll carrier with straps and such. The good thing about this system, is that when the brown tarp is unrolled it is the perfect width (3-1/2) feet and sufficient length to be a groundcloth for half the tent so the material is not dead weight but multipurpose.

It also turns out that the adjustable angle clamps for the frame do wiggle a bit even when tightened to the max. But this was solved with some 4" L shaped metal  braces (bent in a vice to match the necessary angles) and some velcro straps and hose clamps I had on hand. The whole setup looks very amateurish but it is quite sturdy and barely moves. Here is the completed tent frame over the work station...

Wall Tent internal frame 


As mentioned earlier, the angle connectors can be adjusted.  This allows one side of the roof to be lifted up to serve as a 6' high canopy converting the wall tent into campfire tent mode. In a way, the cheapness of the angle joint clamps kind of worked here. All I do is remove the velcro straps supporting the homemade brace on the centre ridge and extend the out the poles that are nested inside the two side legs of the tent. The structure then morphs into this...

Baker / Campfire Tent frame setup


As a tent run, the completed shelter was thrown onto the frame and it fits nice and tightly. All my measuring and remeasuring seems to have worked. Here you can see the front side of the tent with the poly panel on the left and the removable canvas door on the right. I've attached this door using heavy duty snaps set into a 3" flap along the top edges. The doors also close with snaps but not visible is how the poly material extends 6" past the canvas edge on the interior of the tent to form an overlap.


Here's a view from the other side which shows the poly back wall and canvas front wall with a bit of the internal sod cloths folded in. When the pole legs are placed on the turned in sod flaps there is considerable tension and minimal sag with the canvas roof.  The remaining door hasn't been attached yet.


With the tent still on the frame, the side was brought up to form the canopy. It would be much less awkward if two people did this at both ends simultaneously, but I managed doing this alone. For the photo below, the canvas door was removed and the 3 foot canvas side wall rolled up and secured to a crossbar of the frame. In this mode, the canopy is 7foot wide by 4.5 feet deep.


With the pool table / ping pong table taking up so much internal space, I couldn't really get any clear shots of the interior. Also being in the basement means the tent can't be staked down. Once the ground thaws out in the backyard, it'll be setup there with a few lines from the side grommets which should tighten up the structure even more.

Still of few details to be worked out, but I also plan to take it to a nearby park so it can setup using a ridge line between some trees. If successful, this external ridge setup will require six, 3ft poles to support the sides when in wall tent mode. Those same poles can be reused to form the 6 foot canopy poles when in Baker Tent setup so carrying all the poles for the full frame won't be necessary

More pics and details in another post.


Thursday, December 22, 2016

Red Pine Paddle and Canoe Cups from Luc Poitras

Paddle maker Luc Poitras has submitted more photos of his work, including this paddle made from Red Pine:


Here are some of Luc's canoe cups made from various woods...


A crooked knife with etched handle and copper wire wrapping.


Sunday, May 15, 2016

Wool Blanket Kids Canoe Pack

After making the father & son set of wool tripping sweaters, some surplus blanket material was left over. I was wondering about what to do with these scraps when I stumbled upon a new 2016 collection being made by the folks at Duluth Pack. Seems like they've branched away from canvas as their only product material and are now making packs out of wool blankets.


Their prices are getting a bit too obscene for me, with this little pack retailing for $225 US before shipping. But at least it became the source of inspiration. There were just enough blanket remnants to make a small canoe pack for my older son.

My boy was involved in the process and wanted two important features to him - a pocket in the front to slip in paper for drawing stuff and some way to hold a blanket on top. This was because he saw a backpack like this being used in favourite cartoon show at the moment, Kung Fu Panda.

After doing some experimenting with the material, we had enough to make a box style pack (dimensions =  15" h x 11" w x 6" d ) and basically decided to mimic the style and function of my Canadian made Woods 200 pack. The seams are hand stitched but since this will be a light duty pack seeing occasional use, they should hold up fine. Of course it isn't waterproof but I've got an unused drybag that should fit nicely on the inside to keep contents from getting soaked.

Some leather straps and roller buckles left over from an unsatisfactory attempt at making snowshoe bindings were reused here. Below are some photos of the pack stuffed with clothes and other stuff to give it shape.


Front View


Rear View


Like the Woods packs, the side panels extend up a little to form flaps. Some grommets and paracord tie them together to partially secure the load. A large square of scrap blanket was sewn on the interior of the front side to form a slip pocket.


The long straps can be crossed over when closing like the first photo or be used to secure something on top. Here is a fleece blanket roll that we used for the photo.


I've since added a piece of oil tanned leather the the bottom to give it a little more protection and stiffness. He likes it and is getting more excited about our planned canoe camping trip this summer.


Friday, March 18, 2016

Wool Blanket Tripping Sweater

One of the winter projects on the list this year was an attempt to make my own tripping clothing. I've got no experience with this kind of stuff and no sewing machine, but a found a few folks on bushcraft forums who made sweaters and anoraks from wool blankets.

Empire Wool and Canvas used to make something the Wool Blanket Shirt which looked perfect for shoulder season tripping in cooler weather. Unfortunately, they've discontinued making them and moved on to more complicated garments.

Discontinued Wool Blanket Shirt from Empire Wool & Canvas


Duluth Pack makes a wool blanket shirt too but their high prices and cost of shipping (especially with the Canadian Dollar exchange) made it unappealing.

Duluth Pack Wool Blanket Shirt


After finding some basic plans and watching videos (searchwords: "wool blanket anorak" or  "wool blanket shirt" or "boreal shirt"), I set about making a custom sweater with a $50 clean wool blanket from a military surplus store. This one was very clean and had none of that chemical moth-boll smell from other imported blankets I came across. The added bonus was that the 62" width was perfect for my arm span.

First, the blanket was folded (unevenly) with a bulky fleece sweater laid down as a pattern. The blanket was positioned so that the stitched bottom hem would be the front of the overall seater and the decorative stripe would be across the belly.


Using some blackboard chalk, I traced around the sweater with about a 1/2" extra seem allowance.


It was simple enough to cut out, but the blanket shifted a bit and the back side was a tad lower than the from. I also cut out a circular neck pattern at the centre point.


The many descriptions of handstitching mentioned the blanket stitch as the most practical. I used some excess waxed braided cord from the leather making toolkit to stitch up the sides.

Blanket stitching


For the collar, I took some extra material from the striped section of the blanket and folded in half stitching up the sides and then inverting.

Collar ready to stitch


At this point the sleeves ends, front  slit opening and the rear bottom were all raw cut edged. I could have left it as such but worried about fraying. Instead of using the blanket stitch again on these parts, I went crazy and decided to use a double loop lacing method with a 3/32" roll of flat leather lace. It has been sitting unused since using it to make braided awl sheath back 2010. Here is a shot of it around one sleeve end...

Lacing the arm cuff


At this point, I debated making some wood toggles for the neck closure, but decided against it when I saw some left over brown paracord sort of matched the leather lacing. Six small loops of scrap blanket material were stitched on the inside of the neck opening with their stitches hidden by the lacing material. The paracord was woven through and finished with a decorative knot.


Here's the final sweater. It is very warm and has some decent wind resistance. At least being wool, it'll be spark resistant so I can get close up to a warming fire with worry of burning spark holes. 


I guess the true measure of success was the fact my 7 year old son liked it and asked it I could make him one. There was enough material for me to make him a similar sweater without the leather laced cuffs. Hoping to get use out of these during a shoulder season trip with the little man.


Wednesday, November 18, 2015

Origami Reflector Oven Project

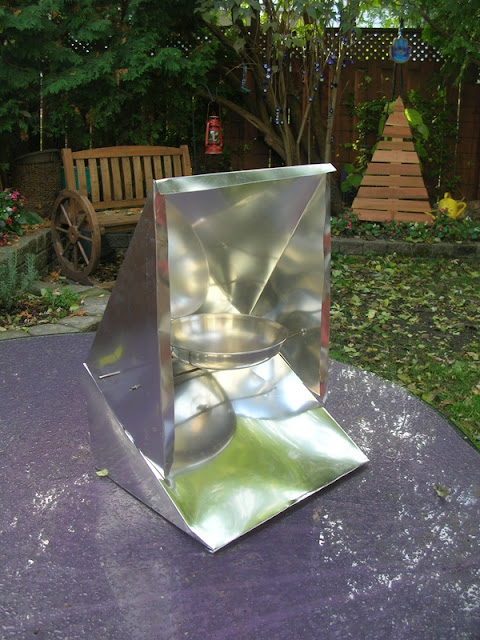
Back in 2013, a post by Operater6 on the BushcraftUSA forums (link here - member login required) showed his ingenious plans for making a mini reflector oven from a large oven foil tray. Called the "2 Dollar Reflector Oven", it involves making a few cuts and folds to a piece of aluminum resulting in a perfectly functional reflector for solo use.

Oven Liner Aluminum Tray - Cut to a basic hexagon pattern


Folded into shape


Rigged up with small tray

Cooking Biscuits on the trail


He very generously provided plans for others to try and replicate his smart little invention...


Folding Oven Plans


I had saved his link and pics with the hope of creating one as well. Instead of using the aluminum oven trays however, I ended up using something else that was found a few weeks back on garbage day. Someone in the neighbourhood was throwing away a shiny roll of aluminum. I thought is was some sort of flashing but it turns out it was a camping accessory - the BakGlo Campfire Chair Warmer. Here are some shots of the product from the company page...


This one was well used and kind of dirty with tree resin and other junk, but a quick cleanup and polish made it good to go. As soon as I saw it, it seemed perfect for this project. If it's meant to reflect heat from a campfire to warm your butt, figured it could be used to actually bake some real buns on the trail.

First some masking tape was laid out to form the pattern since pencil marks didn't show up well on the shiny surface. Given that there was more material to work with than a dollar store aluminum tray, I deviated from Operator6's original measurements. Top to bottom was 21" long (20" + 1/2" folded edge on each end)


Pattern taped out


Sheet cut out


At this point, I folded along the appropriate lines according to the plans (while keeping the tape on temporarily) and the reflector began to take shape

Folding up and down

The plans call for two tabs to be inserted into slots. These were marked and cut after folding. You can see the tabs partially inserted below

Tabs sliding into cuts


At this point I still felt the whole thing was a bit wobbily but found that by folding the tails on the bottom piece inward 90 degrees stiffened things up.

Folding in the bottom legs for stability


At this point, I used a leather punch to poke 2 holes on either side. A 24" piece of 1/8 steel rod was bent into a long U shape and stuck into the holes. This added a lot of rigidity as well. My plan is to use the 6" aluminum lid of my Mini Trangia cookset as the baking tray. Don't have that cookset with me in the city, but managed to find another 6" steel pot lid as a substitute for the photo. Here's a shot of the reflector stove all rigged up...


Being a single piece, the oven folds up pretty well, but the triangular wings have a tendency to pop up. 


Found that if I folded it up and placed these wings downward, it could be neatly formed into a 10"x10" package.

 10"x10" folded down

With some scrap cardboard to form an envelope of sorts, I've left with a 11x11 bundle that stays put.  I'll be slipping this into the wanigan and giving it a whirl next season. The cardboard might be a bit overkill, but it could always be used to start a roaring fire and made again when needed.

In its cardboard case


Older Posts Home Page