Friday, February 29, 2008

Shaving Horse - Improvement

Back when I blogged about my first attempt at a Shaving Horse with scrap wood, I mentioned my error of making the slot for the anvil too wide. This resulted in the anvil head leaning to one side and not fully clamping the paddle when pressed. So to solve the problem I needed a new clamping head that would be as wide as the workstation.

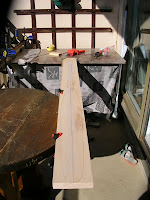
I found what I was looking for in my growing scrap pieces pile - a piece of rough-sawn yellow poplar that had been severly chiped on one edge, resulting in a bit of a natural point. I cut off a 5.5 inch wide piece, the actual width of the 2x6 board used in making the horse. The picture shows where I cut it from the stock and a rectangular through mortise I cut out to attach it to the anvil.

I quickly realized that a scrap piece of disfigured maple (with a major knothole) I had been keeping would be the perfect piece to complete the anvil. It was just a slight bit more narrow than the slot I had cut in the horse so there was no chance of the anvil wiggling from side to side when pressed with the foot pedal. By cutting a through tenon that would fit in the poplar head piece, I'd be able to make a stronger anvil that would still be able to be disassembled. This would be my first attempt at cutting something like this, but with a few careful measurements I proceeded to cut out the maple stock with my regular cross-cut saw and ended up with a crude, but satisfactory tenon for this project. To finish off, I used a 1 1/4" spade drill bit to cut a hole for a hardwood dowel. This I ensured was a 1/4 inch lower than where the anvil head would rest so that I could custom fit a dowel and secure the head in place.


Measured tenon lines and final anvil

The hardwood dowel scrap I had lying around was flatten on one edge by clamping it to a vise and using the handy spokeshave. This way, when inserted in the hole it would press flat against the top of the poplar anvil head and hold it in place tightly. This took some trial and error to get right as I didn't want to over shave the dowel piece I had on hand. Everything worked out well and the head fits nice and tight. On the horse, I drilled 2 more hole positions for the 6inch carriage bolt used as the fulcrum so as to be able to move the vise closer or further away as the project demanded.


Flattened Dowel & Assembled Headpiece

Ultimately, I wanted to re-install the foot pedal system on the first edition, but fitting it with the maple piece required to much extra reshaping of the wood. So I just used the spade bit to drill another hole for the remaining bit of scrap dowel and that is used as a pedal. I could cut another through mortise in another scrap piece to use as a peddle and hold it in place on the bottom with a smaller piece of dowel, but I'm lazy and want to get back to paddle making.


My horse isn't going to win any prizes for looks, but this new edition folds down well for storage & transport and suits my current paddle making needs.

By the way, for anyone else who wants to build their own, I basically adapted my horse from the info gleamed on the following links:

• Richard Burton's plan
• Bob Smalser article at WoodCentral.com
• Tom Rettie's article at BloodandSawDust.com
• The photo intensive page at trod.org


Saturday, February 23, 2008

Maple Sparrow Solo

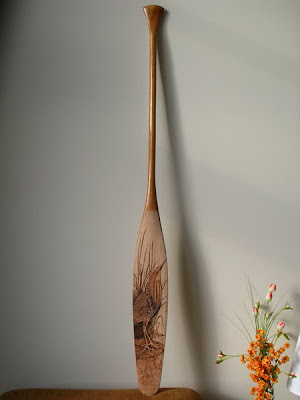
Given my happiness with the Walnut Solo Kingfisher blade made back in September of '07, I wanted to make another. I scored a fantastic figured maple board (11ft) that I had cut into halves. The width of the board (4.5 inches) was perfect for this solo paddle design. For the grip, I wanted to try a different style...a circular spoon grip. Marking out, sawing the blank, and dressing the blade went by without a hitch. By now, my routine for setting up blanks is pretty quick.


Winter was in the air, so working on the balcony became steadily impractical. So I resorted to using my newly constructed shaving horse set up in the condo locker room for the bulk of the shaving. A drop sheet and quick sweeping contains all the shavings. Given that this was maple (quite dense and heavy), the blade was purposely thinned less than 3/8th inch (the common thickness for blades).


The spoon grip was kind of my own experiment. Circular grips are documented in Adney's Bark Canoes and Skin Boats of North America, particular with Eastern Cree paddles (a design I intend to carve after I get more lumber stock). Apparently this circular shape allows for multiple grip positions without really changing your hold...sounded good for solo style paddling with underwater recovery strokes. Rather that have a complete circular shape, I opted for more of a teardrop shape with the intentions of scooping out the palm region with a spooning knife. The initial carving out looks really rough and ragged but with enough effort (and a whole load of sanding) I was quite happy with the results.

For the artwork, I chose an image of a Song Sparrow (Melospiza melodia) - a rather drab looking, brown spotted bird that has a melodic buzzing song. It looks like most sparrows but can be differentiate with a noticeable large brown spot on its breast. The narrow blade width of the paddle was quite suited to this smaller image and given that I intented to make this my main solo blade, I wanted to minimize burning on the whole blade in case I weakened the already thinned out maple blade.


Sparrow image sketched onto blade


Sparrow closeup


Spoon grip with native Sparrow image


Whole paddle posing with winter sunshine


Wednesday, February 20, 2008

Shaving Horse - First Edition

After 10 paddles carved on the balcony furniture or picnic tables at the cottage, I decided it was time to build a shaving horse. This would essentially allow for the hobby to be completed indoors during the winter months in my condo locker room. I first used a shaving horse at the Canadian Canoe Museum's Preserving Skills workroom with heavy hardwood stations built by Don Duncan. They were great to work on, but I knew that for my needs, a smaller version would suffice.

The priorities for me were:
  1. Portability - it needed to be able disassemble / fold for minimum space & storage into my tight locker room
  2. Lightness - weight was an issue for transportation / use
  3. Cheap - wanted to re-use waste wood for ecological and cost reasons.

So I set up planning a design after checking out sample pics on the web. The ones at the Canoe Museum were "Dumbhead" style that worked on a lever built into the centre of the bench as opposed to "English" style that had a frame style vise which would be more cumbersome while working on a long paddle. Furthermore, most designs I saw required permanent fastening with wood screws that prevented any form of foldability. This wasn't feasible in my limited workspace. But while contemplating ideas to get around this dilemma, I came across a large industrial door hinge left over from another project when looking for tools & scrap materials for the build. The hinge would be the answer I was looking for.

As luck would have it, I had purchased some plastic sawhorse brackets from Home Depot earlier in the month to make a portable sawhorse for use on the balcony, but then scored a great deal at Canadian Tire for 2 folding metal sawhorse ($8.99 each - normally $34.99!). So the brackets sat unused until deciding to use them for the horse. With some old 2x6 and 2x4s, the industrial door hinge, and the brackets I ended up constructing the basic design.


For the anvil, I had some 1x3 and pressure treated lumber scraps that I screwed together. The base was made with some more scraps joined together to form a foot pedal that attached with some 3 inch carriage bolts found in a bucket full of old nails & screws. To fit the completed vise on the horse, I ended up drilling 4 pilot holes in the 2x6 and cutting out a rectangular slot with a coping saw.


Once disassemble and packed, the whole horse takes up little space. The parts fit nicely on the frame and with a couple of velcro straps, everything can be easily transported. Assembly is easy too. The anvil is held in place with a 6" carriage bolt.


The height & angle of the workbench can be adjusted with a scrap piece of wood wedged under it. It is held in place no problem once some foot pressure is applied to the vice. So the door hinge idea worked


The final product


Taking the horse for a ride


Overall, I'm quite happy with it. Pretty low cost & labour given that the materials were lying around anyway. The one mistake I made was making the slot for the anvil too wide and as a result, the anvil leans to one side when pressed down with the foot pedal. I'm now working on a solution (a better anvil) using a thicker maple scrap piece cut from making the maple white water paddle this past summer. More on that "upgrade" later.


Saturday, February 16, 2008

Cherry Bittern - Refurbish

Back in May of '06 (before my paddle making days), I attended the Ontario Paddle Sports Expo, hosted by Swift Canoe and Algonquin Outfitters, at the King City Campus of Seneca College. It was an opportunity to check out some boats and gear. The weather was quite chilly and the crowds quite sparse, but I walked away with what I thought was a good deal at the time.

Jodie-Marc Lalonde, founder of Turtle Paddle Works had a booth and was selling some of his well known paddles at the show. I was quite interested in his Custom Solo paddle, but instead he introduced me to his new design, the Stylus. At the time, I really wasn't well versed enough to know what I should look for in a paddle or what to look for in terms of quality, but after briefly discussing stuff with him and inquiring about other designs, the Stylus was recommended. Knowing what his paddles retail for in many stores, I appreciated the deal he was offering.

It would be many weeks before I could really test the paddle under actual conditions at the lake. Initially I was quite impressed with the blade design (still am), but I found his grip to be too small for my hand and carved too thin for my liking, something that I only noticed after an hour of steady paddling. The sharp angled ends would dig into my palms and it got to be that I couldn't enjoy the paddling experience. I was even more dismayed that after only a single, prolonged use in a deep water lake conditions, the varnish on the blade began blistering and peeling in thin strips. I'm assuming the the coating was insufficient and water seeped in causing the thin varnish layers to lift. Don't get me wrong, I probably just ended up with a slightly inadequate paddle that I'm sure he would have replaced given the company's guarantee, but at the time, I just let it go. The paddle would sit pretty much unused for another year and half.

Fast forward to my newly acquired skills and I realized that this paddle made of prime black cherry could still be "saved". After the experience with my own Walnut Solo Refurbish, I felt I could removed the flaking varnish, give the paddle a quick sanding, and burn another birding image on the blade. Given that there's nothing really I'm willing to do with the handle, the paddle would basically be another showpiece.

I've often heard a mysterious "plunking sound" while paddling near reeds...sort of like large rocks plopping into deep water. After checking out WhatBird.com, I found out that it was an American Bittern. Turns out they're quite shy and solitary and so well camoflaged that when disturbed (by a snoopy paddler for instance), they tilt their neck up and sway back and forth with the reeds. Even though I've technically never seem one, I figured hearing one was good enough, so a Bittern image was chosen based on a couple of online photos of the bird like the one on the right.


Close up image of the Bittern on the Blade


The whole blade


Whole paddle before final varnishing


April 17/08 Update: The blade has now been varnished and completed. You can check out the results HERE


Wednesday, February 13, 2008

Poplar Nootka Raven Paddle

Even though traditional canoeing in my area of Canada evolved for the many inland lakes and rivers in the region, I've also been interested in the large ocean-going, cedar dugout canoes of the North West coast. The Indigenous Peoples of the this Region carved amazing, exotic shaped paddles from the prevalent cedars found in that part of the country.

Warren's Canoe Paddles book has a outline sketch of one particular North West coast paddle made from the Nootka People, more correctly known as the Nuu chah nulth. It is a peculiar in that it has a large area, sweeping blade that ends in a protruding tip and a long, flattened shaft region with roll-style grip. The few online versions I've been able to find are high end artworks decorated in the amazing style of the region. On the right is an example I found on the Inuit Gallery of Vancouver website (Scroll down in the Northwest Sculpture section to find it). The paddles details:

Eagle Design Paddle
by Morris Sutherland
Nuu chah nulth
Carved paddle of yellow cedar and abalone
65" x 7" x 1.5"


What a beauty! Upon doing some more research, I found out that "yellow cedar" is not a true cedar at all, but a member of the cypress family. It's other common name, Nootka Cypress, and latin name Callitropsis nootkatensis, are named in honour of the Nootka people. My local supplier didn't carry it and finding quality (non constuction grade) Western Red Cedar was also challenging. In the end, I thought I would use another "yellow" wood that is also not a member of the tree family its name implies...Yellow Poplar (Liriodendron tulipifera), a member of the Tulip family and apparently not a true poplar at all.

This is another paddle in which I never took any pictures of the carving process (done up at the cottage over a sunny weeklong holiday in the summer). It also contained what I perceived as my first major error in paddlemaking. While sawing out the blank, I cut too deep into the shaft area, resulting in an extremely narrow (less than 1") throat area. My only consolation is that cedar & cypress wood are quite soft requiring thicker shafts, but Yellow Poplar is a hardwood that could probably withstand this error if used lightly. A roll style grip was carved (similar to the Cherry Fusion Paddle) but it was left protuding much more than other Nootka paddles I had seen. This was done for my own preference of a larger grip area. I took it out for a test run on the lake in order to wet the grain before final sanding and even though it was meant for ocean-worthy dugouts, I found the shape and style conducive to solo style paddling in a smaller canoe.

As for decorating, I wanted to maintain the native decor and ideally burn a Raven image, seemingly appropriate for this work. Months went by before any suitable idea could be found. On my last visit to Canadian Canoe Museum in the fall of 2007 (can't get enough of that place), I took a shot of some Haida paddles on display with a dugout canoe. I really liked the 2nd paddle from the top, an elongated raven image.


A few days later, I was reading a back issue Canoe Roots magazine (Fall 2006), where there was an article discussing Kirk Wipper's history of collecting canoes that ultimately formed the basis of the museum today. In it was pic of a Haida canoe with an identical Raven image painted on the bow. Check out the specific page on the online archive here. So I burned this image, flipping the orientation so that the "beak" of the bird pointed towards the tip while adding some extra background markings on the blade. By burning at high temperature, the wood was charred almost black, nearly mimicking the effect painting with black acrylic. Here are the results:


Haida Raven on the Blade


My interpretation of a Nuu chah nulth Paddle


Yellow Poplar doesn't have the rot-resistant properties of cedars / cypresses, so this paddle will need to be varnished before use, but I haven't done that yet and am debating of leaving it as as another wallmounted showpiece


Monday, February 11, 2008

Walnut Nuthatch Experiment

After sawing out the Custom Solo Kingfisher blank from a decent piece of stock, I was left with a rather long cutoff piece of walnut. At it's widest point it was 3 inches but at least 58 inches long. Rather than simply waste the wood, I thought I could put it to use for an experimental paddle.

At the time, I hadn't graduated to making laminated paddles, so the idea of sawing out a straight section to make a shaft hadn't occured to me. Instead, I remembered reading somewhere that authentic voyageur paddles were quite narrow compared to modern standards, some as narrow as 3 1/4 inches with 30 inch blades. This seemed to be consistent with the paintings of Frances Ann Hopkins. She accompanied her husband, a Hudson's Bay Company official, travelling extensively by canoe along some of the most important fur trading routes during the late 1800's. Her detailed paintings are considered to be the most accurate representation of the Voyageurs during that time. The paddles do indeed look quite long and narrow, consistent for an occupation that required relentless paddling.

I thought I'd try to make one of these "authentic voyageur" paddles as an experiment with the remnant wood. The piece was 3 inches at its widest point, so I figured a blade would be feasible even if slightly narrow. Problem was, the wood tapered near the grip area, resulting in a width of less than 1 1/2 inches, so in order to form a grip, I'd have to improvise. I decided to glue a crosspiece against the face of the shaft area and carve a crude assymmetrical T-Grip. Not very authentic voyageur like, but experiments are meant to try something new, right?


Front of grip


Side View & Back View

As expected, the blade is quite flexible and not very powerful for solo paddling (I kinda knew that going in). But if imagined 7 other voyager paddlers in a 24 ft. Canot du Nord, I could see how paddling an narrow blade like this would prevent fatigue at 50-60 strokes a minute.

As for the decoration, the extreme narrowness of the blade and its faster pace usage inspired me to burn an image of a tiny, hyperactive bird - The Red-Breasted Nuthatch. I've seen these tiny creatures in action and they're quite interesting to watch climbing down tree trunks head first storing food in cracks of bark or searching out old stashes. As with most of my current work, I'll have to wait till spring to varnish. Here are the final pictures:


Red-Breasted Nuthatch closeup


The whole paddle


Saturday, February 9, 2008

Laminated Ottertail Jay

After my perceived success with the laminated greenland paddle, I decided I would attempt my first laminated canoe paddle and settled on an ottertail blade...the same blade design as my first paddle made at the Canadian Canoe Museum Workshop. I also liked the contrasting look of the dark and lighter woods used in the kayak paddle, so decided on a simplistic 3 piece design.

Century Mill had planed 1 1/8th inch square strips of soft maple for me and I used one of these as the shaft. For the blades, I wanted to recycle wood cuttings from some of my other paddles rather than cutting new stock. While sawing out the Passamaquoddy Northwoods paddle out of the walnut stock a few weeks back, I had created 2 side pieces that could be used to create a blade. Problem was that the edges were had been rough-sawn and not squared so the edges would not be flush during the glueing process.

At this point, I tried hand planing the edges, but quickly realized by woodworking skills had not progessed sufficiently to properly plane by hand. So as a cost effective measure, I went to my local Home Depot and rented a Makita Power Planer ($17 for 4 hrs). Pretty simple to use and with a couple of runs over the walnut (aligning the grain away from the tool to avoid tear out), the edges were now square. Thoroughly convinced after using this tool, a few weeks later a purchased a Mastercraft model on sale at Canadian Tire for $50.


The glueing and clamping were straight forward as before. For the grip, I had other scrap pieces that were glued up to form a common "tripper style" grip. After more handsawing on the balcony, the paddle blank finally took shape and I was eager to begin shaving the blade. By this time, I was confident thant I would be able to shape it pretty quickly. What I hadn't counted on was the fact that I had glued the walnut with opposite flowing grain to the maple shaft. In effect, everytime I used the spokeshave on the blade, I would tear out one of the two woods. This made the process more time consuming because I would have to switch directions with the spokeshave quite frequently. The weather had begun to turn and snow was on the ground but working outdoors was still comfortable.


Shaping the grip area was quite easy as the grain pattern was oriented properly. I purposely made the top of the grip quite wide to suit my hand shape and then thinned out the lower section to make it appropriate for Canadian Stroke / Northwoods style paddling.

After a thorough sanding, it was time to wet the grain before the final sanding and the decorating stage. Wetting the paddle at this stage gives you a peek at the actual colour tones when the paddle is finally varnished or oiled. The two toned paddle may look garish to some, but I really like the contrast. For the burning, I decorated the blade with a Blue Jay image and burned a second, native inspired Jay image on the flattened section of the grip.


Wetting the blade


Started the Jay burning after sketching on the blade


The completed blade image


Native Jay on the grip


The whole paddle


May 5/08 UPDATE: This paddle has now been varnished. View it here.


Newer Posts Older Posts Home Page