Friday, September 18, 2009

Northern Sound Ply Canoes

Came across the site of another builder of beautiful birchbark alternative (plywood) canoes. Check out Northern Sound for some more pics and video like the ones below.


Tuesday, September 15, 2009

Crooked Knife Project - Part 1: Salvaging Blades

An indispensible tool in the making of bark canoes is the crooked knife which is basically a one-handed draw knife used for shaving and shaping wood. It has a fascinating history with some of these knife handles elaborately decorated to become museum pieces. The Algonkian name for the knife is mocotaugan and a great site/online book documenting the history and usage can be found here

Even though my bark canoe is pretty much finished and I sort of "cheated" by using a block plane for most of the shaving, I've been intrigued with the design and functionality of the crooked knife and have been thinking about making one for "bushcraft style" paddlemaking for some time. Graham Warren's paddlemaking book has a chapter (written by David Gidmark) that shows the steps in making a crooked knife from an old file but discusses using propane torches and bench grinders for the bulk of the work - a little intimidating for me.

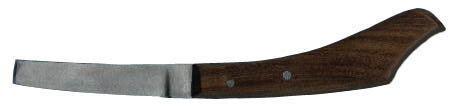
I had already obtained a manufactured crooked knife from John Lindman's model canoe kit, but the blade was horribly dull, the metal was wouldn't sharpen properly, and the rivetted handle was uncomfortable in my hands. The instructions that came in the kit mentioned that the blade was still soft and not really hardened enough to sharpen with a stone. It had to be superheated (to cherry red) and plunged into oil in order to harden it all the while not damaging the wooden handle. I figured since I disliked the handle, I would drill out the rivets, salvage the blade, rework the metal to a sharper edge and make my own customed knife.


Manufactured Crooked Knife

Then, as if it was waiting to be reincarnated, I stumbled upon a 6" rusted Mill Bastard file in my father's old toolbox. I vaguely remember him using such a file to sharpen old garden shears and the lawn mower blade back in 70's. Inspired by some illustrations in old texts as well as this posting of making a crooked knife without a forge or powertools, I set out to make a crooked knife from scratch. If my efforts failed, then at least I'd have the manufactured blade to rely on.


The file destined to become the blade


Illustration of making a crooked knife

First of course, the metal file needed to be needed to be softened by heating up to a bright orange colour and cooling softely. This was achieved lighting up the fireplace with hot burning hardwood on a rainy evening and heating the file on the coals. An empty juice can stuffed with cold ashes (obtained from a campfire pit that morning) would serve as the cooling medium, although I read that one could also use sand and vermiculite from gardening stores.


Heated file cooling overnight in ashes

The next day the file was removed and the tip tested for softness by cutting into it with a hacksaw. If the blade had not annealed properly, the sawteeth wouldn't have been able to bite and make a cut. Heating in the fireplace seemed sufficient as photo below shows.


Test cut with a hacksaw...metal now softened

Then the labour truly began. Using another identical file on hand, the metal teeth and ridges were filed off with hand grinding. This messy, tiring and boring job took a whole lot of time over the course of a week, but it did work. When both sides and the edges had been ground relatively smooth, an angled edge was begun. I marked up 1/4" line from the edge with permanent marker and ground the side down to a chisel edge with an angled motion of the file. This left some scratched tool marks on the metal which I tried to clean up with 400grit automotive sandpaper. By this point (with very sore wrists and forearm muscles), I gave up on trying to polish the thing to a mirror image. Here is the result after many (non consecutive days) of working the file.


Filing off the teeth; Blade shaped and polished

In another post, I'll be documenting the next steps, including tempering the blade and making a customized handle.

Sept 25 UPDATE - Part 2 has been posted



Sunday, September 13, 2009

Another Adirondack Guide Paddle

Another Adirondack Guide Paddle for sale by the folks at Summer Antiques. The grips on these paddles are so unusual. A previous post shows off some more of their selection which haven't been sold by the looks of things.


Friday, September 4, 2009

Summer's Last Paddle

Well, we're back from our vacation up north. Regrettably, my paddling season may be over with the demands of work and the real world taking over again. But at least I was blessed with a calm lake and gorgeous setting sun to take a couple of shots in the bark canoe before she rests again for another winter. The last shot was snapped by putting the camera on a neighbour's floating dock, setting up a 10 second time-delay and maneuvering the canoe into the frame.


With the nontraditional kneeling pad and stuff sack


Paddling View


Just in the frame

Despite the brief melancholy I'm experiencing right now, I've been busy with a few new paddle designs and other summer projects that'll be on the site soon.


Tuesday, September 1, 2009

Cherry Edged Beothuk - Part 3

With all the fun distractions this past summer, I haven't sat down and worked on a paddle for a while. So I decided to get back in it and work on the Cherry Edged Beothuk that had been giving me problems since it was started back in July of '08. When I last posted on this different design, the cherry parts of the bobble grip were being laminated onto the main gripface.


The initial square grip with sketching; Cherry pieces, Glued up

With the glue long dry, it was time to start shaping the octogonal grip into something resembling a spherical bobble. Problem is that with time being limited resource as a new father, multi-tasking has become a necessity.

Lately our little one has been more finicky than usual and needed constant rocking during one of our little excursions to the small lakeside beach at the cottage. In an effort to sooth the boy while also making some time for the paddle, I set up a bushcraft-style nomadic hammock recently taught to us by a relative overseas.

Known as a "Gypsy Swing" in Turkey, this ingenious contraption is found all over the countryside and may be the saving grace for any parent. All that it requires is a rope (I had a 20ft line of cheap polypropylene), a medium sized Turkish Kilim (a large beach towel would suffice), and two sticks. After some experimenting with Evenk Knots and other hitches from a Ray Mears episode on Bushcraft the lines were all set. Some creative folding of the kilim and stretching out with the sticks and the little hammock was set up complete with a view of the lake. To control the swing, an extra line was attached to big toe to provide the foot power rythym.


Set up between the trees


Drifting off to nappy time


Toe powered with hands free to carve

He drifted off quite quickly and I was able to crudely shape the grip into a fair-sized bobble. While not exactly perfectly shaped, the amount of labour involved and the never-ending drive of attaining spherical perfection made me stop when the grip felt comfortable in the hands.


The Bobble Grip

Not being able to resist, I took the paddle for a quick test spin in the lake even though it had not been thoroughly sanded with fine grit. The blade, very similar to the cherry edged Kayak Paddle I made last year, handles well and the bobble is actually quite comfortable to use for basic forward strokes. As a solo paddler however, many correction strokes require quite different positioning on the grip and in this regards the bobble is limiting. Still it's quite logical (and an unusual paddling sensation) to use a spherical grip which actually fits the shape of a relaxed hand quite nicely. I'll be taking this one back to the city to decorate the blade over the winter.


Unfinished Beothuk Paddle


Newer Posts Older Posts Home Page