
Even though my bark canoe is pretty much finished and I sort of "cheated" by using a block plane for most of the shaving, I've been intrigued with the design and functionality of the crooked knife and have been thinking about making one for "bushcraft style" paddlemaking for some time. Graham Warren's paddlemaking book has a chapter (written by David Gidmark) that shows the steps in making a crooked knife from an old file but discusses using propane torches and bench grinders for the bulk of the work - a little intimidating for me.
I had already obtained a manufactured crooked knife from John Lindman's model canoe kit, but the blade was horribly dull, the metal was wouldn't sharpen properly, and the rivetted handle was uncomfortable in my hands. The instructions that came in the kit mentioned that the blade was still soft and not really hardened enough to sharpen with a stone. It had to be superheated (to cherry red) and plunged into oil in order to harden it all the while not damaging the wooden handle. I figured since I disliked the handle, I would drill out the rivets, salvage the blade, rework the metal to a sharper edge and make my own customed knife.
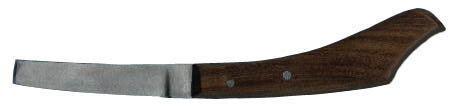
Manufactured Crooked Knife
Then, as if it was waiting to be reincarnated, I stumbled upon a 6" rusted Mill Bastard file in my father's old toolbox. I vaguely remember him using such a file to sharpen old garden shears and the lawn mower blade back in 70's. Inspired by some illustrations in old texts as well as this posting of making a crooked knife without a forge or powertools, I set out to make a crooked knife from scratch. If my efforts failed, then at least I'd have the manufactured blade to rely on.

The file destined to become the blade

Illustration of making a crooked knife
First of course, the metal file needed to be needed to be softened by heating up to a bright orange colour and cooling softely. This was achieved lighting up the fireplace with hot burning hardwood on a rainy evening and heating the file on the coals. An empty juice can stuffed with cold ashes (obtained from a campfire pit that morning) would serve as the cooling medium, although I read that one could also use sand and vermiculite from gardening stores.

Heated file cooling overnight in ashes
The next day the file was removed and the tip tested for softness by cutting into it with a hacksaw. If the blade had not annealed properly, the sawteeth wouldn't have been able to bite and make a cut. Heating in the fireplace seemed sufficient as photo below shows.

Test cut with a hacksaw...metal now softened
Then the labour truly began. Using another identical file on hand, the metal teeth and ridges were filed off with hand grinding. This messy, tiring and boring job took a whole lot of time over the course of a week, but it did work. When both sides and the edges had been ground relatively smooth, an angled edge was begun. I marked up 1/4" line from the edge with permanent marker and ground the side down to a chisel edge with an angled motion of the file. This left some scratched tool marks on the metal which I tried to clean up with 400grit automotive sandpaper. By this point (with very sore wrists and forearm muscles), I gave up on trying to polish the thing to a mirror image. Here is the result after many (non consecutive days) of working the file.


Filing off the teeth; Blade shaped and polished
In another post, I'll be documenting the next steps, including tempering the blade and making a customized handle.
Sept 25 UPDATE - Part 2 has been posted


12 comments:
Really looking forward to the next installment!
Thanks! Just posted the next part about tempering.
I have a file too that has been just sitting there, calling to me to turn it into a crooked knife! I don't think I'll forego the propane torch and electric grinder though! Power tools all the way on that part.
Cheers,
Bryan
My heated file now sits amongst some ashes cooling. I tried the barbecue, but that didn't really get it hot enough (almost glowing, but not really) so I switched to a propane torch.
Do you know the purpose of the ashes? Is it simply a means of cooling the steel slowly?
Cheers,
Bryan
Never thought of using the BBQ for the heating process - might've been a practical alternative, but now that I think about it, many sources cite the need to get up to 600 degrees C for the proper annealing of the metal to occur. Not sure if BBQs are designed to get that scorching hot. Yes, the ashes are simply used as a safe method of cooling the blade slowly or apparently the metal becomes soft, but too brittle.
Good luck with your knife Bryan.
Hi Murat,
I started grinding down my file (soon to be knife) tonight. I quickly found my $5 garage sale bench grinder is terrible (I knew that already). Fortunately, the angle grinder I "won" at a family Christmas gift exchange and had not yet used works great. (I'll have to thank himy uncle again for not sticking to the $15 price limit on the gift exchange.) It is, however, a tad noisy. After 10 minutes of playing with the angle grinder in the garage at 11:30pm I figured I'd better save the rest for daytime hours when I wouldn't upset both my wife and neighbours. I think 15-30 minutes with the angle grinder and I will have a blade ready for bending. Not as peaceful or as meaningful as the way you did it though.
Cheers,
Bryan
Murat great info as usual....wondering if you were aware of this site, http://www.instructables.com/id/CrookedKnife/, re: making crooked knife (does have same plans as you show here)....or if you might have heard of Moose River Handcrafts, http://www.mooseriverhandcrafts.com/index.htm, who among other items make crooked knives (plus great looking ash packbaskets)
Thanks for the extra links Mike. I had seen the Moose River site before...lots of sweet looking items on there - real craftsmanship.
I would recommend using a charcoal chimney fire starter to heat your file, most any chimney will due. They are great for charcoal grills but the natural updraft will create forge like temperatures. A little cooking oil and a sheet of news print is all that is required to get it going.
Yes cooling your file in sand or ash slowly is part of the annealing process so it is soft enough to work. We used sand in metal shop.
Hey, I think your site might be having browser compatibility issues.
When I look at your blog in Chrome, it looks fine but when
opening in Internet Explorer, it has some overlapping.
I just wanted to give you a quick heads up! Other
then that, fantastic blog!
my web site ... Christmas
What grit were you using? What sort of grit would you recommend in general for a woodworking tool sharpener to use for a variety of tools? Thanks!
James, I tend to use a 1000x water stone for general edge sharpening and a smaller 4000x stone to refine or maintain the edge on my tools.
Post a Comment