

Oven Liner Aluminum Tray - Cut to a basic hexagon pattern
Photo Credit: Operator 6 - Bushcraftusa Forums

Folded into shape
Photo Credit: Operator 6 - Bushcraftusa Forums

Rigged up with small tray
Photo Credit: Operator 6 - Bushcraftusa Forums

Cooking Biscuits on the trail
Photo Credit: Operator 6 - Bushcraftusa Forums
He very generously provided plans for others to try and replicate his smart little invention...

Folding Oven Plans
Photo Credit: Operator 6 - Bushcraftusa Forums
I had saved his link and pics with the hope of creating one as well. Instead of using the aluminum oven trays however, I ended up using something else that was found a few weeks back on garbage day. Someone in the neighbourhood was throwing away a shiny roll of aluminum. I thought is was some sort of flashing but it turns out it was a camping accessory - the BakGlo Campfire Chair Warmer. Here are some shots of the product from the company page...


This one was well used and kind of dirty with tree resin and other junk, but a quick cleanup and polish made it good to go. As soon as I saw it, it seemed perfect for this project. If it's meant to reflect heat from a campfire to warm your butt, figured it could be used to actually bake some real buns on the trail.
First some masking tape was laid out to form the pattern since pencil marks didn't show up well on the shiny surface. Given that there was more material to work with than a dollar store aluminum tray, I deviated from Operator6's original measurements. Top to bottom was 21" long (20" + 1/2" folded edge on each end)

Pattern taped out

Sheet cut out
At this point, I folded along the appropriate lines according to the plans (while keeping the tape on temporarily) and the reflector began to take shape

Folding up and down
The plans call for two tabs to be inserted into slots. These were marked and cut after folding. You can see the tabs partially inserted below

Tabs sliding into cuts
At this point I still felt the whole thing was a bit wobbily but found that by folding the tails on the bottom piece inward 90 degrees stiffened things up.

Folding in the bottom legs for stability
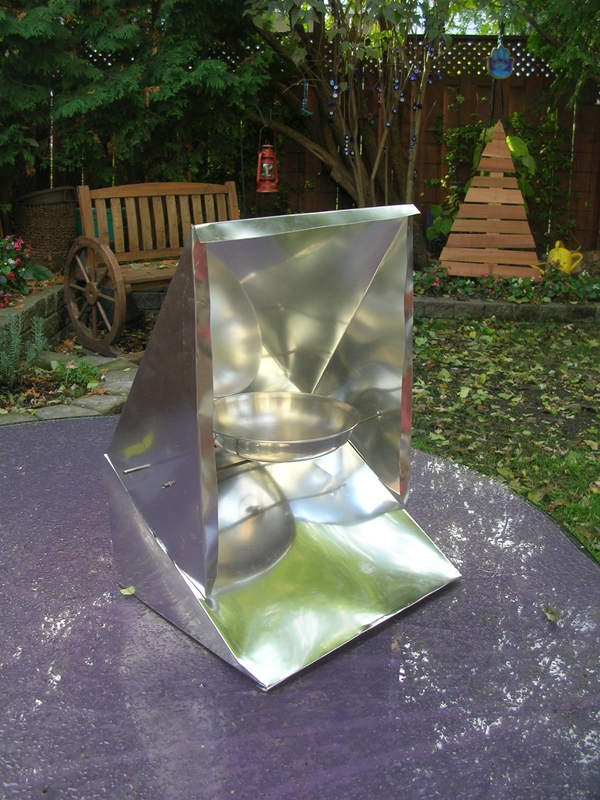
At this point, I used a leather punch to poke 2 holes on either side. A 24" piece of 1/8 steel rod was bent into a long U shape and stuck into the holes. This added a lot of rigidity as well. My plan is to use the 6" aluminum lid of my Mini Trangia cookset as the baking tray. Don't have that cookset with me in the city, but managed to find another 6" steel pot lid as a substitute for the photo. Here's a shot of the reflector stove all rigged up...

Being a single piece, the oven folds up pretty well, but the triangular wings have a tendency to pop up.

Found that if I folded it up and placed these wings downward, it could be neatly formed into a 10"x10" package.

10"x10" folded down
With some scrap cardboard to form an envelope of sorts, I've left with a 11x11 bundle that stays put. I'll be slipping this into the wanigan and giving it a whirl next season. The cardboard might be a bit overkill, but it could always be used to start a roaring fire and made again when needed.

In its cardboard case


2 comments:
Hey Murat, have you tried cooking something in it?
Not yet, David. No place to make a fire - can't burn in the backyard in Toronto. Have a fireplace at the cottage up north though. Going to give it a try over Christmas break hopefully.
Post a Comment